Installation
Tools You Will Need:
Pencil, Level, Screwdriver/drill, Hammer, Pliers
Getting Started:
Every fountain comes with a basin, the art panel itself, either a copper visor or an LED light hood, the pump, and the hardware to hang it. Make sure that you have all of it laid out and ready to go before you begin. Should any of it be damaged or missing, please let us know within five days of receiving the fountain so we can fix it.
Hanging the Basin:
With another person, hold the basin up where you want it to hang. Check to make sure that it is level, and then mark the holes with a pencil on the wall. Next, set the basin to the side, and drill a hole at each pencil mark. Into this hole, push the plastic anchor that came with your pump. Next, hold the basin up against the wall, and gently guide the screws through the pre-existing holes and into the wall.
Make sure the basin feels secure before you move on to the next step.
Now place the pump inside the basin. We use many different types of pump, but know that the pump can sit upright, or on its side and work fine so long as the intake where the water comes in, will be completely submersed later on. You may want to rest the pump on a standard kitchen sponge to absorb any vibrations that the pump might make.
If you would like to hide the cord, you can install a recessed GFI outlet behind the fountain. There isn’t a hard and fast rule for where- roughly 12-16” up from the bottom of the piece and centered will work well.
Hanging the Artwork:
On the back of the fountain, you will see two d-rings. This is what the artwork will hang from. With a second pair of hands, dry fit the artwork in to the basin. It should sit 1 to 2” inside of the basin. When in doubt, use the pump as a guide. The fountain should be just a little above the pump as it sits in the basin.
When you have it positioned as you like it, mark where the d-rings are on the wall and set the panel aside. Just like you did before with the basin, drill a pilot hole in the wall, and gently tap a plastic anchor in to each hole. Next, put a screw in to each anchor leaving roughly a ½” to an 1” of space. Onto these screws, you will now hang the artwork.
Now, take a moment to check that everything is level and feels secure. The hard part is pretty much done.
Next connect the pump in the basin to the clear tube that is dangling from the bottom of the art panel. Make sure that the clear tube isn’t kinked and that there isn’t any debris in the basin.
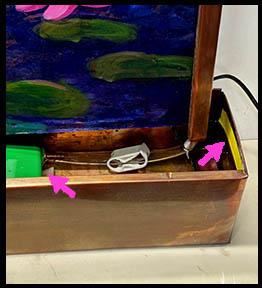
Fill up a bucket of water, and slowly pour it in to the basin. On a standard fountain, you’ll need a little under two gallons of water. Note that if you live in an area with hard water, you can certainly use bottled or distilled water here. See the yellow taped line in the photo for reference as to how much water should be added to the basin. The water should be filled to the bottom of the yellow tape line.


Testing the Fountain:
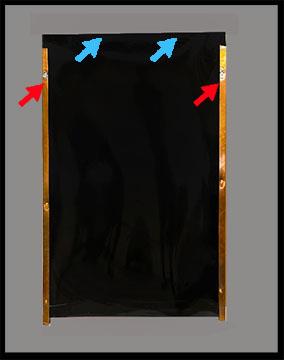
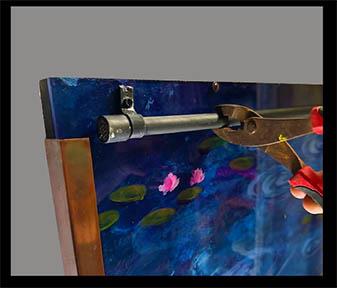
Every one of our fountains is tested before they leave the studio…but things can get jostled in shipment. So get a pair of pliers, and a second pair of hands. Have one person plug in the fountain, while the other person checks the flow. First, make sure the white restrictor clamp next to the pump is wide open for maximum flow. When you turn it on, the water may take a minute or two to settle down. Now is a good time to make sure that the water is hitting the artwork roughly perpendicular and flowing smoothly down. If the flow is too strong, or you are getting some splash, then first start by squeezing the white clamp one click at a time until you get a flow that you are satisfied with. If the water is spraying out towards you, or above the tube… or anything other than a nice flow, then take the pliers and twist the tube until you get a flow that works for you. If you did not order a fountain with lights, then the final step is to place the copper visor on top and you are done. Or, if you ordered an LED light hood, once you are satisfied with the flow of the water, you want to gently remove the clear tube from the pump, take the artwork down off the wall, and screw the light hood in to the back of the fountain at the top, (see the blue arrows in the photo for reference), and then put everything back as it was.
And that’s it! We hope you get decades of pleasure out of these. We are a small studio, and this isn’t just our business, but it’s our passion. Thank you for your purchase!


Troubleshooting
The water is splashing. Try:
Remove the copper visor, and make sure that the tube is positioned so that the holes are hitting the artwork at either a 90-degree angle or slightly below that.
Try squeezing the white restrictor clamp so the flow of water is slower.
One of more of the holes in the tube is dripping, spitting, or just erratic. Try:
Turn off the fountain. Take a pair of pliers and twist the tube towards you. With either a pipe cleaner or a paperclip, ream out the hole to remove whatever debris may be in there. If multiple holes are clogged, you may have to gently pull the feeder tube out of the brackets and use either a garden hose or the sprayer in your kitchen sink to remove the gunk built up inside the tube.


The water flow is weak. Try:
First make sure that the clear tube isn’t kinked. Next make sure there is enough water in the basin. The pump’s intake valve should be completely underwater. Next open the white clamp and try “burping” the pump- plugging and unplugging it a few times to get rid of air bubbles. Also, if parts of the water flow are spotty, you can lightly tap on the tube with a screwdriver or pair of pliers to disrupt any air bubbles that might have built up in it.


The water is splashing on the floor: Try:
Like the other issues, make sure there is enough water in the basin and check to make sure that the tube is properly positioned. Too little water or too fast a flow can cause this. You can also roll up a piece of window screen and lay it down in the basin with some of the screening above the water line. The screening will act as a catcher’s mitt. It will also create a quieter sound.


